Saturday 31 May 2014

Nonya Dumplings

When I told my hubby that I am making Kee Zhang myself this year. He gave me a challenge to add in this yummy Nonya dumpling in my to do list too! I remembered I used to help my Mum to cut the candid winter melon into small pcs while my sister cut the onions with tears. Haha! Sweet Memories. Back to topics, since my man had set me a target, I got to fulfill his wish. I browsed through blog & Youtube and come out with this yummy combination. Do give it a try if you love NONYA dumplings like my family. My kids, hubby and even my Mum gave me a thumb up!
Nice triangle Nonya dumpling! Success!
My kids gave me a super thumb up, it's really Yummylicious

Nonya Dumplings 
(Make 24-28pcs medium size)
  • 800g of glutinous rice, washed and soaked overnight
  • 60pcs of dumpling leaves, soaked overnight and clean for wrapping
  • Some dried grass straw, soaked overnight

Filling
  • 650g lean pork, cut into small cubes
  • 50g of dried shrimp, soaked and chopped into small pcs
  • 12 dried chinese mushrooms, soaked and cut into small cubes
  • 200g of Candid winter melon, Chopped into small cubes
  • 5 tablespoon of coriander powder, add in water to make into paste
  • 6 garlic and 12 small shallots, chopped
  • 1/4 cup of cooking oil
  • 1 tablespoon of dark soy sauce
  • 2 tablespoon of sugar
  • 2.5 teaspoon of salt
  • Some pepper to taste
To fry the Glutinous Rice
  • 3 tablespoon of oil
  • 3 shallots 
  • 1 teaspoon of coriander powder
  • 1 teaspoon of salt
  • some pepper.

Steps
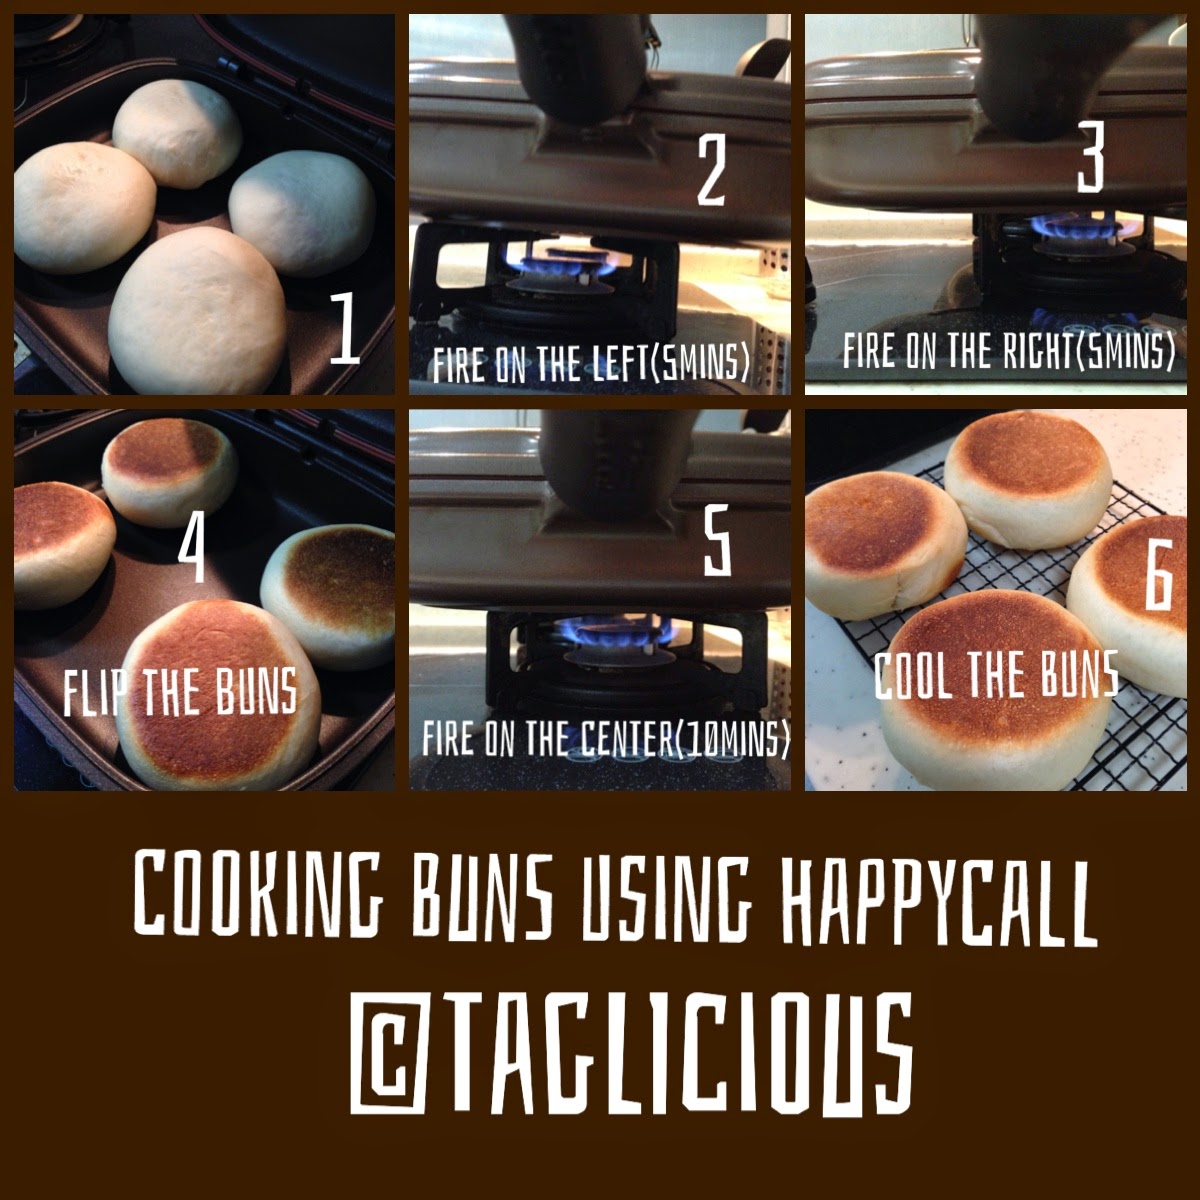
Preparing the glutinous rice
  1. Stir fry shallots with oil in the pan till it is golden brown. Remove the shallot and keep the oil in the pan.
  2. Add in coriander powder, salt and pepper to the oil and give a good stir for 30sec.
  3. Off the fire and add in the glutinous rice and give a good stir and set aside for wrapping later.
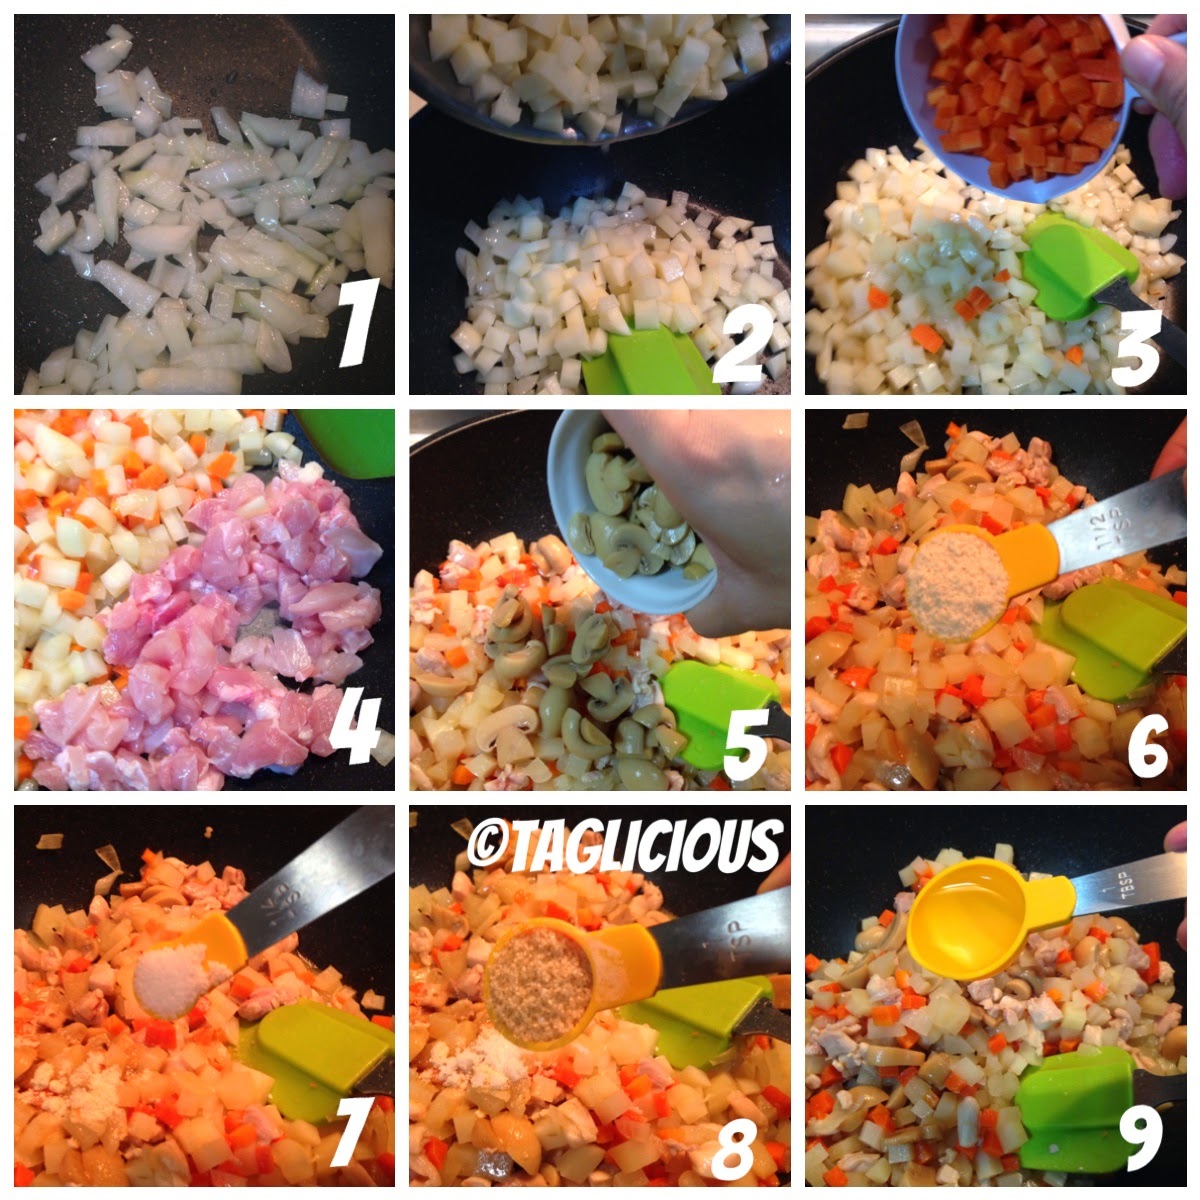
Preparing the filling
  1. Add in oil and heat it in a pan. Saute the garlic and shallot till it is golden brown.
  2. Add in the dried shrimp and fry till fragrant.
  3. Add in the coriander paste and continue to stir fry.
  4. Add in the mushroom, pork and winter melon and continue to stir fry
  5. Add in the dark soy sauce, salt, sugar and pepper.
  6. Cook till dry and set aside for wrapping later
To wrap the dumpling
  1. Take 2 leave and form a cone.
  2. Line the cone with a little glutinous rice, follow by the filling and top the glutinous rice to cover.
  3. Wrap the dumpling and tie it tightly with the grass straw.
To cook the dumpling
  1. Cook a large pot of water 
  2. Immerse the dumplings in the boiling water
  3. Boil it for 2 hrs.
  4. Bring out the dumpling from the pot and hang cool the dumpling for at least 1 hrs before serving.
TAGlicious Ciao~

Do like and join me at my Facebook page Taglicious


Lye water Rice Dumpling ~ Kee Zhang

The Dragon Boat (Duwan Wu) Festival is around the corner. Last year, I attended the dumpling festival celebration at Fujian Hui Guan and learnt how to wrap my very first dumpling. I set a target to make my own rice dumpling this year. For a first timer like me, I choose the most safer and easier dumpling to make just in case I failed the task. I seek for my mummy's advice, she roughly guided me what is the basic ingredient needed and preparation. It's sound easy but the fearing part is the wrapping of the rice dumpling. I glad that I tried and I did it! If I can do it, you can do it too!

Kee Zhang with Gula Melaka Syrup
Lye water rice dumpling
(Make 40-45 mini size)
Things needed:
  • 1 kg of glutinous rice 
  • 1 lye rock
  • 90pcs of dumpling leaves or more ( I used 2 leaves to wrap one dumpling) 
  • Dried grass straw

Steps:

  1. Soak the dumpling leave & dried grass straw one day before the dumpling making.Use a cloth to clean the leaves before wrapping.
  2. Wash the glutinous rice till the water is clear.
  3. Dissolve the lye rock with some hot water.
  4. Pour the lye water to the washed glutinous rice and give a good stir. Soak it overnight.
  5. To wrap a dumpling, take 2 dumpling leaves and form a cone.
  6. Fill up the cone with the Glutinous rice.
  7. Wrap the dumpling and tie it tightly with the grass string.
  8. Once wrapping is done, Bring a large pot of water to boil.
  9. Immerse the dumpling in the boiling water, make sure all dumplings is cover by water.
  10. Boil for 2 hrs. Remember to add in water to cover the dumpling every 30-45mins.
  11. Bring out the dumpling from the pot and hang cool for at least 1 hr before serving. 
Kee Zhang tastes bland. Some of you serve it with KAYA, Honey or Sugar. I love to have my Kee Zhang with Gula Melaka syrup. Making the syrup is simple. You take a pcs of gula melaka and cut them into small pcs. Add in some water to boil and dissolve it under low fire. 

Yummy

TAGlicious Ciao~

Do like and join me at my Facebook page Taglicious


Monday 26 May 2014

Crispy Pork Floss ~ 肉松

My Ah boy loves to have PORK FLOSS  with his porridge since young.  I do concern about the ingredients used for store buy pork floss but I never thought of making it at home until Lena from a cooking forum shared how she make it using her bread maker. Her posting attracted me to give it a try too since my kids love it so much. Due to my Zojirushi Bread maker do not stir throughout the JAM process, my pork floss came out still wet and the floss is not thin enough. In order to salvage it,  I blend the pork floss using my U-like blender and give a final 20mins wok frying to dry it further. The pork floss ended up very CRISPY & my kids love it so much. Do you want to give this recipe a try?

Crispy Pork Floss
Just in love with the golden brown  pork floss...
Crispy Pork Floss ~ 肉松
(Reference from Lena Lai)

Things needed:

To cook the pork in water ( The liquid can use as broth)
  • 500g Pork (I used 假梅肉)
  • 1 apple (optional, it does add in sweetness to the soup)
  • 3 slice of ginger
  • Some spring onions
  • Water to cover the meat
Seasoning for the pork floss
  • 2 tablespoon of fish sauce
  • 2 tablespoon of soy sauce
  • 6 tablespoon of brown sugar 
  • A pinch of pepper

Steps
  1. Cut the pork into big cubes.
  2. Cook the pork with the apple, ginger and spring onions in water for 45mins. Do remember that the liquid can use as broth, do not waste it.
  3. Take out the pork meat from the soup and cool down for 30mins.
  4. Put the meat into a zip lock bag and roll it with a roller. This is to break the pork into flake. Alternative is to use a fork to break the meat to flake.
  5. Mix all seasoning together till the sugar had dissolved in a small bowl. Mix the seasoning + pork together and combined well.
  6. Start to stir fry the pork using a wok under medium low ( I used non-stick wok) for 20mins. (Look at pics 7, the meat still in big flakes)
  7. Blend the meat using a blender ( I blend it when the meat is HOT), this is to break the meat into thinner stripes. Easier for kids to eat it. (Look at pics 8, the meat is break down into smaller flakes)
  8. Continue to stir fry the blended floss in the wok for another 20 mins or till the floss turn golden brown and dry. Keep a look out on fire, you won’t want to end up having pork floss with burnt smell.
  9. Once done, let it cool down and store the pork floss in an air tight container.
TAGlicious’s note:
  • You can keep the homemade pork floss in an air tight container up to a week. If you want to keep it longer, keep it in the fridge.
  • If you have a bread maker at home that can stir throughout the JAM process, do use it to make this pork floss.
  • If you have any left over meat from soup, do not waste it, keep it and make into this yummy pork floss. 
Does it attract you to give it a try?

TAGlicious Ciao~

Do like and join me at my Facebook page Taglicious


Thursday 22 May 2014

Chawanmushi ~ 杯子蒸蛋

Chawanmushi is an egg custard dish found in Japan. Unlike many other custard, it is savory and usually eaten as a dish in a meal. This savory egg custard is made of an egg mixture and flavored with soy sauce, dashi and mirin with other ingredients such as mushrooms, japanese fishcake, shrimp. This dish is very similar to our chinese steamed eggs but the topping may be often differ. I will prepare it for my kids quite often as they love this dish a lot.

Chawanmushi ~ 杯子蒸蛋
(For 2 big cups)


Things needed:
  • 2 large eggs
  • 1 teaspoon of soy sauce
  • 1 teaspoon of mirin
  • 4g of dashi granules
  • 200ml of water 
  • 1 chicken fillet (Cut into small pcs)
  • A handful of mushrooms
  • 4 crab sticks
  • 4 gingko nuts
Steps:


  1. Crack the 2 eggs into a bowl. Add in the soy sauce & mirin and beat mix well using a pair of chopsticks.
  2. Dissolve the 4g of Dashi Granules with 200ml of water. 
  3. Add the dashi stock into the egg mixture and mix well again.
  4. Place chicken fillet, mushroom, crabsticks & Ginko Nuts in the cup.
  5. Pour the egg mixture into the cup using a sieve till it is 3/4 full.
  6. Cover the cup using cling wrap and send them into a preheated steamer to steam for 15mins under medium high fire. 
TAGlicious Notes:
*** Ingredient to place in the chawanmushi can be change to your preference.
*** I got my Dashi (10small pack of 4g Dashi granules) from Daiso. 
*** Steaming time may varies depend on the size of your Chawanmushi cup.  

Do you want to have some too? 


TAGlicious Ciao~

Do like and join me at my Facebook page Taglicious


Tuesday 20 May 2014

Chicken Potatoes Buns using HappyCall (平底锅烤面包)

This is not the first time I use HappyCall to "bake" my buns. When I am lazy to move all my things from my oven, my Happycall will come to the rescue. Believe it a not, we can use our pan to "bake" buns too but we got to pay extra attention on the fire to prevent it ending up burnt buns! There is no short cut method when come to Bread making. We need at least 3hrs (knead, 1st proof, shape, 2nd proof and bake) for the whole process to complete. However, if you really want to give this a try but do not want to spend so much time, do give this Amazing 40mins Buns recipe a try but using this method to "bake".

Ok, let get started for the original recipe I wanted to share with you.

Our supper & Breakfast
Look at the soft and fluffy buns!
Basic Bread recipe 
(Adapt from Carol Hu's bread baking book)
Make about 8 buns

Things needed:
  • 270g of bread flour
  • 30g of cake flour (You can replace it with bread/plain flour)
  • 1/2 teaspoon of instant yeast (I used 3g)
  • 1 egg (weigh about 50g without shell)
  • 30g of sugar
  • 1/8 teaspoon of salt
  • 150ml of milk
  • 30g of soften butter


Cookware needed: HappyCall / Non stick cooking pan


Steps:
  1. Place all the ingredient into a mixing bowl except butter and start kneading it into a dough using a stand mixer/bread maker/hand for 5mins. Add in the soften butter and continue to knead till the bread dough become elastic. It normally takes about 15-20mins.
  2. Cover the bread dough with cling wrap and go through 1st proofing for 45-60 mins or till it doubled it size.
  3.  Pull out the bread dough from the mixing bowl and place it on your tabletop. Flatten it and divide the dough into 8 small portions. Roll each portion into a ball and let it rest for another 10mins before we wrap in our filling.
  4. Use a rolling pin and flatten each bun ball and place a portion of chicken filling and seal it up into like a bun, Remember we cannot put too much filling, it will only give us problem of  sealing up the buns. (Yet to upload a video for better understanding, will update soon~)
  5. Place the buns into the cookware and go through 2nd proofing for another 45 mins or till it double it size. Happycall can only hold 4 buns Max. Proof the rest on the buns on a plate and cover it with cling wrap.
  6. We are ready to "bake" it in Happycall. On the lowest fire, place your Happycall on the stove toward the left side first to bake for 5mins. Then shift it to the right side to bake for another 5mins. 
  7. Open up the lid and flipped the buns using tongs and place the buns toward the 4 corners (This is to prevent from getting burnt from direct heat). Closed the lid and continue for another 10mins of baking. This time place your Happycall in the center of the stove. (Look at the picture).
  8. It's done and serve warm. 
Happy buns using Happycall benefit more to those of you without oven.

TAGlicious's Note:
*** Do check the buns during "baking" to prevent it from getting burnt.
*** Cooking time varies depending the size of the buns. Do try and error to tune to your cooking style.
*** Feel free to change the filling. Original recipe actually call for Mozzarella Cheese. However, i would suggest to combine some sugar and mozzarella cheese as filling. Maybe I should try this soon. :)
*** These buns can bake in preheated oven at 170C for 15-20mins.

TAGlicious Ciao~

Do like and join me at my Facebook page Taglicious


Chicken Potatoes Filling for Pies & Buns

My girl has been pestering me to make chicken pie as she misses mine recently. Heehee! I hope my humble Chicken potatoes filling suit your taste bud too.

Chicken Potatoes Filling

Chicken Potatoes Filling
(Can make into 15-20 buns/mini pies)

Things needed:


  • 2 russet potatoes (diced)
  • 1 carrot (diced)
  • 1 yellow onion (diced)
  • 1 boneless chicken thigh (diced)
  • 1/2 can of button mushrooms (diced)
  • 1.5 teaspoon of chicken powder 
  • 1/4 teaspoon of salt
  • 1 teaspoon of sugar
  • Some Black pepper 
  • 2 tablespoon of water
  • Some corn/potato starch + water to thicken the filling
  • Some oil
Steps

  1. Heat up a cookware with oil and sauteed the yellow onions till it translucent.
  2. Add in the potatoes and carrots and stir fry it for 2 mins.
  3. Add in chicken meat and stiry fry it for 2 mins.
  4. Add in button mushrooms and stir fry it for 1 min.
  5. Add in all the seasoning + water and give a good stir and cover the pan with a lid and let it simmer for 10mins till the potatoes & carrots is soft. 
  6. Lastly, add in some black pepper and use the starch + water to thicken the filling.
  7. Let it cool down and use for pies/buns later.

TAGlicious Ciao~

Do like and join me at my Facebook page Taglicious


Monday 19 May 2014

Chocolate chips Bananas Muffins with little SURPRISE ~ Cream cheese

There were 3 BANANAS super ripen waving hands at me this morning. I decided to make them into Muffins and served it as breakfast for my loved one. All you need is 15 mins of preparation, 20 mins to bake & 5 mins to wash up your bake wares. Isn't it sound easy? Due to I had modified my previous recipe to make into a healthier one and didn't know it actually will turn out well. I didn't take any pictorial but I will try add in once I make this again.

Our Healthy Breakfast!
Look @ the SURPRISE! Reduce oil & sugar still give a very moist and soft muffins


Chocolate chips Bananas Muffins with Cream Cheese
(Make 6 regular size Muffins)

Things needed:

Dry ingredients
  • 190g of plain flour 
  • 1 teaspoon of baking powder
  • 1 teaspoon of baking soda
  • 1/4 teaspoon of salt
  • 1 handful of chocolate chips (add more as per your preference)
Wet ingredients
  • 3 Large bananas ( Try to use super ripen one for natural sweetness) -> Abt 270g
  • 50g of brown sugar
  • 1 egg
  • 1 tablespoon of vanilla extract (I used my home-made)
  • 40g of olive oil
  • 30g of milk/soy milk
Additional suprises
  • 3 pcs of laughing cows cream cheese (Cut into 1/2 to place it in the middle of each muffin)
  • Some rolled oats (Optional)

Steps
  1. Place the dry items into a bowl and mix well.
  2. Mashed the bananas in another big bowl, add in the sugar mix well. Then add in oil, egg, vanilla extract & milk and mix well till everything is well combined.
  3. Combined the wet & dry items together and stir in till it is combined. Do not over-mix it. The batter should be lumpy. 
  4. Filled up 1/3 of the muffin cups with batter and place in 1/2 pcs of cream cheese. Continue to fill up the muffins cup with the batter.
  5. Finally top some rolled oats on top of each muffin. (This is optional)
  6. Bake in a preheated oven 170C for 18-20 mins or until it is fully cooked. 
TAGlicious's Note:
*** I filled up the muffin cups almost full to achieve a nice dome top.
*** Individual muffin cups size and oven varies, cooking time may varies. 

TAGlicious Ciao~

Do like and join me at my Facebook page Taglicious


Teriyaki Chicken Don & Salad Takeaway!

For a working mum like me, I love to prepare food in a simple way. Let me share with you how to make this Teriyaki chicken at home and present it in 2 different ways for your loved one.

 Who say eating salad is so boring?
Add in different kind of veggies/fruits & Teriyaki chicken to make lunchbox Takeaway!
Jap Rice, Boil some broccoli & cauliflowers to go with this Teriyaki chicken to make dinner.
Teriyaki chicken

Things needed

  • 4 boneless chicken thighs (Wash and remove extra fats but keep the skin)
  • 3 tablespoons of Sake
  • 3 tablespoons of Mirin
  • 1.5 tablespoon of Soya Sauce
  • 1.5 tablespoon of Brown sugar

Steps:
  1. Combined all the condiments together and marinate the chicken at least 2hrs before cooking it. (I prepare it the day before normally)
  2. Heat up the non stick cookware (I used Happycall) and pan fry the chicken with the skin down first for 10mins. No oil is required as the chicken skin will release the fat.
  3. Then turn if over and pan fry it for another 10mins.
  4. It done!
TAGlicious's Note:
*** Cooking time varies depend on the size of your chicken thigh.
*** If baking in oven, please arrange the marinated chicken & sauce into a baking dish. Bake it in the preheated oven at 200C for 25 ~ 30 mins/until it is fully cooked. Try and error on the baking time.
*** Daiso do not sell Cooking Mirin & Sake anymore. However you try to get it from most supermarket under Japanese section else you can try Meida-ya.

This made a yummy & healthier dinner/Lunch for AGEE

TAGlicious Ciao~

Do like and join me at my Facebook page Taglicious


Saturday 17 May 2014

Simple 3 ingredients ~ Japanese Cotton cheesecake

I came across this simple Japanese Cotton cheesecake by ochikeron some time back. The recipe was so simple that you only need 3 ingredient. Since this is a small cake, I decided to make 2 cakes with 2 flavors (White Chocolate & Dark Chocolate).  Let start baking it!

White Chocolate & Dark Chocolate Cotton Cheesecake...Yum
Will AGEE prefer this White Chocolate Japanese Cotton Cheesecake?
Or AGEE prefer this Dark Chocolate Japanese Cotton cheesecake?


Japanese Cotton Cheesecake
Adapt recipe from Ochikeron -For better understanding, do view the video.
(For 6 inches non removal cake tin)

Things needed:-


  • 125g of cream cheese (Soften cut into cubes)
  • 120g of white chocolate chips/bar
  • 3 large cold eggs
Steps 


**Preheat the oven till 170C
  1. Place your white chocolate on a big stainless steel bowl and melt your white chocolate chips under hot water (Double boiling method). 
  2.  Add in the Cream cheese into the melted white chocolate mixture and mix well till it is well combined.
  3. Separate the egg yolks & egg whites. 
  4. Add in the 3 egg yolks into the batter and mix well. Set aside and prepare the Meringue.
  5. On a clean bowl, add in your 3 eggs whites and use a electric whisk and beat till firm peak form.
  6. Look at picture 9, I had tested that the meringue is ready as when I do the turn over test. (Try at your own risk)
  7. Add in 1/3 of the meringue into the batter and fold in slowly using a spatula till it is well combined.
  8. Add in 1/2 of the meringue into the batter and fold in slowly using a spatula till it is well combined.
  9. Lastly add in the remaining meringue into the batter and fold in till it is well combined. I prefer to use a whisk to fold in. Individual preference.
  10. Pour the batter into the cake tin. (Remember to lay the baking sheet for the cake tin.)
  11. Place the cake tin into a baking tray, pour in some hot water onto the baking tray and put into the oven. This is water bath baking to prepare the cheesecake from cracking. 
  12. Bake the cake for 15mins under 170C then reduce the temperature to 160C to bake for another 15mins. Lastly, off the power but continue to let it bake inside the oven for another 15mins.
  13. Once baking is done, transfer the baking tin on a wire rack and let it cool down completely.
  14. Sprinkle some icing sugar (optional) onto the cake and it is ready to serve!
TAGlicious's Note
** For Dark chocolate version, steps are the same. Just replace the amt of white chocolate to dark chocolate.  
** If you are using a removable tin, do remember to use aluminium foil to wrap your cake tin to avoid water sip into your tin during water bath baking.
** I chilled the cheesecake overnight before serving as we prefer to serve the cheesecake cold.

White chocolate Japanese Cotton Cheesecake is the winner!
Verdict: we can't really taste the cheese in Dark chocolate cheesecake, it taste more
more like a chocolate cake. . 

Hope you like my sharing today! Do give it a try. 

TAGlicious Ciao~

Do like and join me at my Facebook page Taglicious

Monday 12 May 2014

Mango Sticky Rice

Mango sticky rice is a traditional Thailand summer dessert because mangoes are in season during the summer months of April and May. The best part is you can prepare this delicious Thailand dessert at home easily too.


Yummy coconut cream
Mango Sticky Rice

Mango Sticky Rice
(For 4 pax)

Things Needed:

  • 1 cup of glutinous rice 
  • 1 knob of pandan leave (Optional)
  • 2 ripen mangoes
  • 200ML of cocounut cream
  • 1 tablespoon of sugar
  • 1/4 tsp of salt
  • Toasted Sesame Seeds (For Garnish and taste)


Steps:
  1. Wash and soak the glutinous for 2hrs. Drained off the water and put a knob of pandan leave and steam it under high fire for 40mins.
  2. While the steaming the glutinous rice, you can prepare the coconut cream sauce. Heat up a non stick cookware, Put in the coconut cream
  3. Put in the sugar & Salt and stir with the coconut cream till it is dissolved under LOW heat.
  4. Slice your mango.
  5. Once the glutinous rice is ready, pour 1/2 of the prepared coconut cream into the rice and mix in till it is well cooperated.
  6. Ready to assemble to serve! Enjoy!


TAGlicious Ciao~

Do join me at my Facebook page Taglicious

Toasted white Sesame Seed

Do you know you can toast sesame seed at home easily? You just need a non stick cookware to help you. Let me show you how to do it at home in 5mins.


Toasted white Sesame Seed 

Things needed:
  • A handful of white sesame seeds

Steps:
  1. Heat up a non stick cookware
  2. Place the handful of sesame seeds in.
  3. Start to "toast" it under low fire till it turn golden brown. It takes me about 3-5mins for small quantity. Remember to keep stirring. 
TAGlicious Ciao~

Do join me at my Facebook page Taglicious

Saturday 10 May 2014

Pandan chiffon Cake for Mother's Day!

My Mummy does not like creamy frosting cake. As usual, I will make her all-time favorite Pandan Chiffon cake. Personally, I love Chiffon because it is a light cake made with vegetable oil, eggs, flour and flavoring. It is a combination of both batter and meringue into a light spongy cake.

I did not add any baking powder or tar tar to bake the chiffon. With the "right beat" of the meringue and fold in right, we can achieved a "chemical free" nice light chiffon cake.


Pandan Chiffon Cake

Hope my mummy will love this too...

Pandan Chiffon Cake
(Please based it on the Chiffon tin size and prepare the items)

Chiffon Tin Size 17CM  20CM
For Batter
Egg Yolks 4ea 7ea
Vegetable Oil 50ML 90ML
Pandan Juice 10ML 20ML
Coconut Cream 60ML 100ML
Cake Flour 70g 120g
For Meringue
Egg Whites 4ea 7ea
White sugar 60g 100g

Preheat the oven @ 180C

Here is the recipe for the Homemade Pandan Juice


Steps for making the batter :
  1. Separate the egg whites and egg yolks and put them into 2 mixing bowls (Please be careful, please ensure the mixing bowl for the egg white is clean and dry else it will affect/ruin the process of preparing good meringue.)  
  2. (Let prepare the batter first.)Add in the vegetable oil to the egg yolks and use a balloon whisk to beat it till it is well combined.
  3. Add in the coconut cream and beat it till it is well combined.
  4. Add in the Pandan Juice and beat it till it is well combined.
  5. Lastly, Add in the sieved Cake flour into the batter and beat it till it form into a smooth batter. Set aside and prepare the meringue.
  6. (Let prepare the Meringue.) Use a electric whisk and start beating the egg white till it is foamy.
  7. Add in the white sugar gradually while beating the egg white. 
  8. It took me about 7-10 mins till the egg white form into a stiff peak form (Look at Pics 9).
  9. (Combined the batter & Meringue) Add in 1/3 of the Meringue into the batter and fold in using a balloon whisk slowly till it is well combined.
  10. Add in another 1/2 of the remaining Meringue into the batter again and fold in using a balloon whisk and fold in slowly (As we do not want to deflate the batter) till it is well combined.
  11. Lastly, pour the batter into the Meringue mixing bowl and fold in using a balloon whisk till it is well combined slowly as you do not want to deflate the batter. (Well combined = U do not see any Meringue in the batter)
  12. Pour the batter into a chiffon tin (No need to grease it).
  13. Bake it in a preheated oven for 25mins (17CM chiffon tin) or 30mins (20CM chiffon tin).  You can use a long stick to do a test whether it is fully cooked.
  14. Once it is out from the oven, please inverted the chiffon tin and let it cool down for at least 30-45mins before removing it from the chiffon tin.
TAGlicious Note:
*** You can replace the fresh pandan juice with coconut cream & add in 1-2 teaspoon of Pandan Paste (dependent of the size of your chiffon tin)..
*** Eggs must be in room temperate to prepare this cake.
*** Please use big egg (60g ea) for chiffon cake.
*** Please use a non-stick tin for chiffon cake. 

Yummy Chiffon Cake!

Lastly, Happy Mother's Day for all Mummies out there! You ladies are doing so well!

TAGlicious Ciao~

Do join me at my Facebook page Taglicious